Higher Education - Business and Community Interaction 2019/20: Support guides
This page provides an overview of the 2019/20 Higher Education - Business and Community Interaction (HE-BCI) collection (C19032).
This should be used alongside the C19032 coding manual, which provides more detailed, technical information about the collection.
Need help? Contact us by email or on +44 (0) 1242 388531
Higher Education - Business and Community Interactions overview
We collect data across a number of streams. These streams focus on different aspects of higher education.
The Higher Education - Business and Community Interaction (HE-BCI) stream collects data about the interactions that higher education providers have with businesses and the wider community. Details of what information needs to be returned to us are included in the Coverage document found in the Coding Manual.
The data we collect on behalf of the sector is provided to governments and funding bodies in order to support the regulation of higher education. We also make data available to the public to enhance understanding of UK higher education and to support its advancement.
Our coding manuals provide you with all the necessary documentation to support your data return. The coding manual contains technical documents giving detailed information on the record's coverage, data specification and submission formats. Familiarising yourself with these documents will help you make an accurate and timely return.
Each collection has its own coding manual which can be found in the Data collection section of our site. By default, you will land on the open collection for each record; you can then select previous or future years.
The coding manuals will be updated throughout the data collection cycle and Record Contacts informed by email when new versions are made live. Be sure to check the manual's Revision history for a summary of changes.
You submit data via our Data Collection system. To access this, you will need to have an appropriate role in our Identity System (IDS). We publish an IDS user guide which includes information on creating and editing your account.
You will need to be given access to the Data Collection system by the relevant Record Contact at your provider.
Once you have access to the system you will be able to upload files and track the progress of the collection.
Our expert analysts have a thorough understanding of our records and processes. We are here to support you throughout the data submission process. There is also specific HE-BCI e-learning which focusses on data collection and analysis which is a useful tool for new and existing contacts.
Data collection system: Release history and known issues
| Release ID | Release date | Release summary |
|---|---|---|
| Issue summary | Status | Date raised | Date resolved |
|---|---|---|---|
|
|
Stages of data submission
A. Sending data
Part A
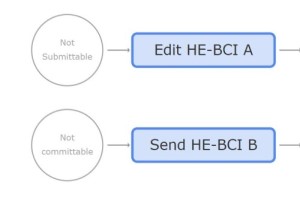
Part A of the record consists of a webform and data can be submitted by clicking on the “Edit HE-BCI A” button. Part A is split into 6 categories:
- Strategy
- Infrastructure
- Intellectual property (IP)
- Social, community, cultural
- Regeneration
- Education and continuing professional development (CPD)
Clicking on each category will open the associated guidance in the coding manual. Clicking on either the questions or "Get Started with Question 1" will bring up the responses section where you can answer the questions. All sections must have a 'Completed' status before the form can be submitted by clicking on the ‘Submit HE-BCI A’ link on the Dashboard.
Part B
Data for section B can be uploaded by clicking on the “Send HE-BCI B” button. Note that actions not currently avaliable will be greyed out.
Browse your computer to locate the file you wish to submit and upload the file to the Data Collection System.
Tips:
- The template can be saved with any name
- Only one file can be sent at a time
- The system does not support Excel 2003.xls format or older. Please 'Save as Type' Excel 2007.xlsx files.
- Files must be returned using the most recent template (.xlsx) provided by HESA. The template for the HE-BCI return can be downloaded from the Data Collection System under “Template Download”.
B. Validation
Automated validation checks (quality rules) will now run.
Further details on the quality rules which apply to this collection can be found in the coding manual.
The Quality rules report will contain the details of any rules triggered by the submission. Make any necessary amendments to the data and resubmit the file to the system. To pass validation, the file must not trigger any validation errors.
How to obtain a switch
When errors are triggered in the Data Collection system but the data has been checked and is genuine, you need to request a switch. This is because your file will not pass the validation requirements of the collection deadlines if there are any remaining errors.
Please email your switch request to Liaison, stating which rule is causing the error to be triggered and for how many records, together with an explanation as to why the data is genuine.
This will then be forwarded to your funding council/regulator for them to review. They may agree the switch, ask for more information or state how they wish the data to be returned so that an error is no longer triggered.
This request should be sent well in advance of any deadline, to allow sufficient time for a decision to be made.
When a switch has been agreed, it will be applied to your data for the count specified and the data will be reprocessed. This will resolve the error.
If the count increases, the rule may trigger again, and you will need to request that the count on the switch be increased. This will be forwarded to your funding council/regulator for approval.
To proceed to commit-level validation, For part A, all questions need to have been answered and part B needs to have been submitted and passed insert-stage validation checks. This is classed as “Committable/Submittable”.
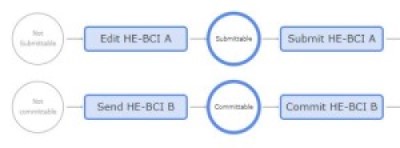
A. Commit
Once you are content with the data, you should commit your submission by processing a Submit transaction for part A and/or COMMIT transaction for part B. This transaction will then send a copy of the submission to the HESA Data Quality Assurance team for us to undertake analysis of the return in parallel with you conducting your own analysis. Both parts of the submission can be committed/submitted independently however please be aware that we will raise additional cross checks based on the other part of the data.
What to do if the file fails COMMIT?
If the file fails commit-level checks you should review the error report produced by the system, make any necessary corrections to the file and resubmit it.
Deleting files
Where you need to make amendments to data, upload a new file. Although all transactions are stored in the system, the new submission will replace the old one.
Why can't failed files be deleted?
Where a file fails insert-stage validation, the data contained within it is not uploaded to the HESA database and so will not be counted as part of the return.
B. Decommitting
A passed commit transaction will lock the system to prevent the data from being amended. This is to allow our data quality assurance team to analyse the submission. To unlock the system you will need to request a DECOMMIT transaction. Both parts of the submission can be decommitted independently.
Request a decommit by email or on 01242 388531
Remember that you need to process and pass a COMMIT transaction in order to meet the requirements of the commit deadline.
Once we have analysed your committed return, data quality queries will be posted onto the Issue Management System data quality database. Relevant users will be notified by email when these queries are available to view. The Issue Management System user guide provides help on using the Issue Management System.
Once your data has passed all the stages of validation, and any issues highlighted during credibility checking have been addressed, we will set the return to CREDIBLE. This produces the sign-off form.
When data is set to credible, a link to the sign-off form is automatically emailed to the head of the submitting organisation as well as the appropriate record contact. The form should be completed and signed by the head of the reporting organisation and returned to us by email or post. This verification offers both you and us assurances regarding onward use of the data.
Sign-off completes the data collection process.